Celebrate with Pozole

As I sat at the table surrounded by family members, I stared at the bowl full of hot stew in front of me. I looked around and could see adult family members enjoying this soup that was new and strange for me. As a kid, I was convinced it was one of those foods that only adults enjoy. My mom encouraged me to try it and with a deep breath, I grabbed my spoon and filled tiny drops of this broth. It wasn’t enough to get the full taste so I took another sip, this time filling the spoon. Instantly and unexpectedly, this dish named pozole had just become my favorite.

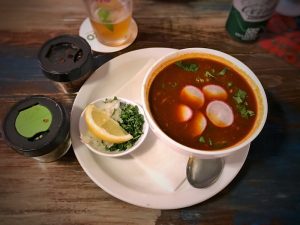
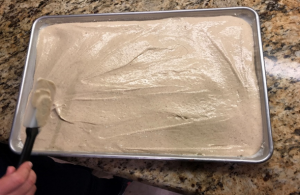
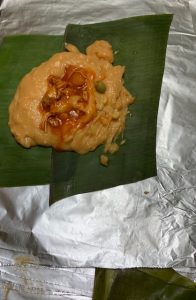
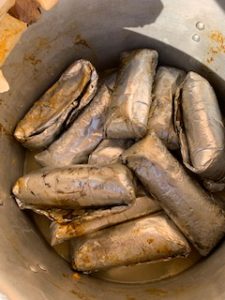
A bowl of prepared red pozole.

The fact that it was a popular dish in our Mexican culture had me confused as to why it took seven years for my mother to introduce this dish to me. I even felt a little resentment that I was not told about it a lot sooner. From then on, I had pozole as many times I could with the belief that I would be making up for all the times I missed out on it. My mom then started making it on my birthdays and soon, it became a necessary tradition for me to celebrate each year. My most memorable birthday with pozole was when I turned 15. It was a rainy day in February during my freshman year in high school as I walked home from school cold and soaking wet. I tried my best not to allow the weather to literally “rain on my parade”. As I opened the front door to my house, my cousin stood in front of me holding pink and purple balloons as I heard my mom and friends yell, “Happy birthday!” The smell of pozole instantly filled my nose and convinced me my birthday was in fact, not ruined at all.

From then on, whenever the topic of pozole was brought up between me and my friends, I would argue that my mother’s pozole was the best and that no one could top hers. Of course, my friends felt the same about their mother’s pozole and would argue the same. To settle this debate once and for all, I would invite my friends over for pozole whenever my mom made it. My friends would always ask, “What’s the special occasion?” since pozole is usually known to be served during celebrations but at this point, my mom was making it “just because”.

Once, I attended a friend’s birthday party where pozole was served. People around me saw that I was hesitant to try it as I only trusted my mom’s pozole. They tried convincing me it was delicious. To my disappointment, it wasn’t as great as my mother’s but I held back from arguing to avoid being rude and so I politely agreed. Ever since I have not tried other people’s pozole except for my mother’s. There was an exception though when my boss had someone make all the employees pozole as a gesture of gratitude during the week of Christmas. As much as I hate to admit, that pozole was better than my mother’s that I did not bother telling anyone that this pozole was better. This pozole was different though: it was green as opposed to my mother’s whose dish was red because of the sauce she used. I was amazed that there were other kinds of pozole! This green version of my favorite dish instantly took me back to 1st grade when I had just finished reading Dr. Seuss’ “Green Eggs and Ham.” I had begged and convinced my mom to make me green eggs and ham at the time. Unfortunately, she can’t make me green pozole since she doesn’t know how to cook it.
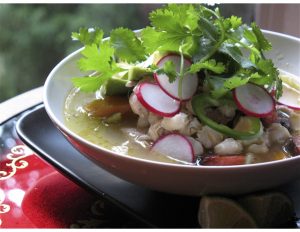
Green pozole.

Although pozole is a popular Mexican dish served on special occasions, people still enjoy it on any typical day. If you’re lucky enough, you may even have a Mexican restaurant nearby that serves pozole freshly made on weekends. Usually Sundays after church many Mexican families go out to eat it. Sundays also became the time of the week that my aunts, uncles, and cousins would go over my Abuelita’s house to enjoy a bowl. I would wake up to the smell of pozole as it filled the house with its scrumptious scent. The smell was the best thing to wake up to.

The table was covered and full of napkins, soda, bowls, cups, tostadas, condiments, and of course, loved ones. It always seemed that we did not have enough chairs for everyone because of how crowded it was with family members. So, when one person was done eating, he or she would offer their seat to someone who was standing. Usually, the kids would sit at the same table in order to allow the adults to sit together and chat away. Even little cousins who were picky eaters liked pozole and would always ask for seconds. Our neighbors from different races and ethnicities would enjoy it as well. Every time pozole was made, we would invite them over or send some their way.

Table with pozole and garnishes.

As I got older, I realized soon my mom would not be able to cook pozole when she got as old as my grandmother who couldn’t cook pozole at her current age. I never learned to cook, not even my favorite dish. I was worried that my family’s recipe would be gone if I didn’t learn. So, at Christmas of 2019, I learned how to make my very first dish. It was easier than I thought but my mother made it difficult with her style of teaching. You see, most Mexican mothers do not use measurements when cooking. When explaining how to make something, they will always say to just “tanteale” which means to put however much of an ingredient you think is needed to cook the dish well. My mother explained to me that “you just feel it”. Since I never cooked in my 27 years of life, it was hard to sense when enough was enough but I managed to pull through. I was proud of myself for making a decent pozole that tasted very similar to my mom’s. I also felt relief knowing that I got the recipe down to pass down to our family’s future generations.

The History of Pozole (Warning: Not for the Weak Hearted)

The only thing I knew about pozole was its delicious taste, but I learned that there is more to it than just that. The term pozole comes from Nahuatl words such as pozole, pozolli or pasole. These words mean foam and it refers to the foam that is made when cooking pozole. In pre-colonial times, Aztecs were one of the many indigenous people of Mesoamerica that cooked pozole. Just like today, the Aztecs cooked pozole to celebrate special occasions such as a celebration for their god, Xipe Totec, who is said to have fed his first people with his own flesh. Because of this, Aztecs included a very unique ingredient in their pozole: human meat! Prisoners and slaves were sacrificed to obtain their flesh. When Spanish conquistadores arrived, they did not allow the practice of their cannibalistic rituals, so the Aztecs started substituting their human meat for pork or Xoloitzcuintles meat, a famous Mexican dog (sounds a little bit better than human meat, right?). Ok, but let’s not let these historic details keep us from enjoying a bowl of my mom’s pozole. Below is her recipe, human-meat free (insert sigh of relief here).
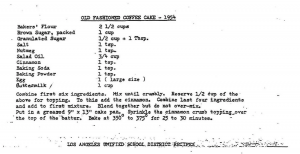
Ingredients

 Go to your nearest grocery store and get:

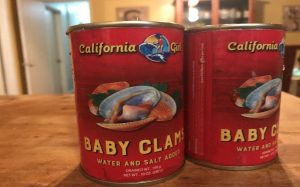
  • 1 can of white hominy
  • 2 lbs. of pork neck bone
  • 2 lbs. of pork shoulder chunks
  • 15 California chili pods
  • 1 head of garlic
  • 2 large onion
  • Salt
  • Radish
  • Lemons
  • Bag of tostadas


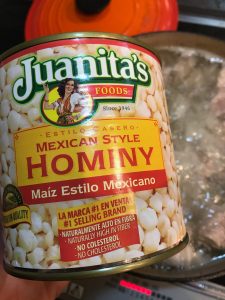
Recommend popular hominy that is commonly used in pozole.

Chili Sauce

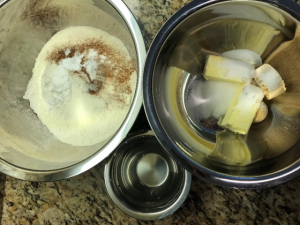
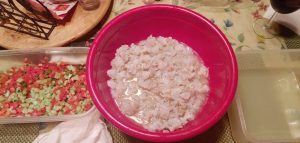
First, you’ll need to make the chili sauce. My mom likes to make red pozole so this red sauce will help do just that. Devein the California chili pods. You can do this by using a knife to cut down the middle and scoop out the seeds using a spoon. Next, you’ll want to rinse the chili pods and soak them in hot water. Make sure to use enough water to cover all chili pods. Once they become soft, blend the chili pods in a blender with the garlic and 1 chopped onion.

Pozole

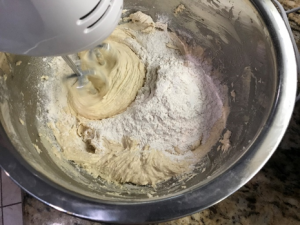
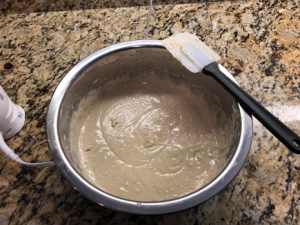
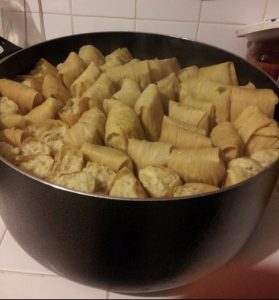
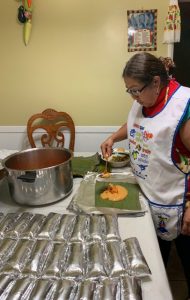
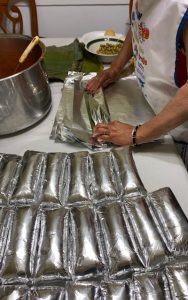
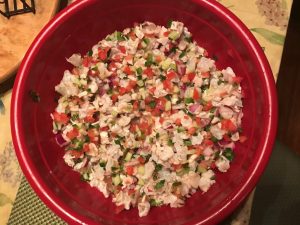
Fill a pot with 1/3 of water and bring water to a boil. While you’re waiting for the water to boil, rinse all of the pork meat and hominy. Add chili sauce, meat, and hominy once the water is ready. Don’t forget to add salt, (“tanteale”) and put as much salt as you’d like to achieve your desired flavor. Leave the stove on High and cook for 2-3 hours. Cut radish, cabbage, onion, and lemons and add to your bowl of pozole. Top off pieces of tostada with pozole if desired. Enjoy the smell of pozole as it fills your home.


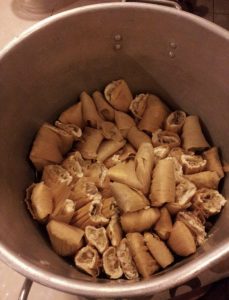
Tostadas, cabbage, radish, and lime.


Prepare to join the debate of who’s pozole is better.


References:

Berkman, J. (n.d.). What Is Pozole? How to Make Delicious Mexican Corn Soup. Retrieved from https://blog.prepscholar.com/pozole-recipes

Cocking, L. (2017, February 28). A Brief History of Pozole, Mexico’s Take on Traditional Stew. Retrieved from https://theculturetrip.com/north-america/mexico/articles/a-brief-history-of-pozole-mexicos-take-on-traditional-stew/

Lopez-McHugh, N. (2012, May 21). Mexico On My Plate: Red Pozole and Its History. Retrieved from https://honestcooking.com/mexico-on-my-plate-red-pozole-and-its-history/

Mazatlan Post. (2018, July 17). Dark origin of pozole an emblematic Mexican dish. Retrieved from https://themazatlanpost.com/2018/07/16/dark-origin-of-pozole-a-emblematic-mexican-dish/

The sacred, religious, and cannibalistic origins of pozole. (2019, September 9). Retrieved from https://www.eluniversal.com.mx/english/sacred-religious-and-cannibalistic-origins-pozole


Chocotorta

The Chocotorta is a very decadent and delicious Argentine chocolate cake dessert that is served during special occasions, birthdays and parties.  The Chocotorta, which is very similar to the Italian Tiramisu, was created sometime in the 1980s by Marité Mabragaña.  Ms.  Mabragaña, an advertising executive, is credited with coming up with the idea for the Chocotorta recipe so that she could combine two of her accounts, Mendizábal, makers of Mendicrim cream cheese, and Bagley, the makers of Chocolinas chocolate cookies, in one commercial.  The Mendizábal and Bagdley accounts were skeptical of the idea at first but were eventually able to be convinced by Ms. Mabragaña to join forces.  The idea

worked better than they had expected, turning the silky Chocotorta into one of the most beloved desserts.  Additionally, Ms. Mabragaña has also been credited with coming up with the concept of cobranding in Argentina.

Even though the Chocotorta has not been around for as long as other better-known desserts, I feel like I have been eating the Chocotorta for as long as I can remember.  I have eaten many versions of the cake but the one I always remember the most is the one my mother would make for us when I was a young child.  It was this silky, chocolatey, dulce de lechey party on my mouth.

My Mother

My mother is an amazing baker.  She makes really beautiful and elaborate cakes.  Family and friends are always asking her to make them cakes for all sorts of special occasions.  The interesting thing is that out of all of her awesome cakes, I always want her to make the very simple Chocotorta.   My mother would make the Chocotorta, and various versions of the dessert, for birthdays, holidays and many other festive occasions.  I have many wonderful memories of her mixing up the dulce de leche with the cream cheese in our small kitchen in Buenos Aires.  I would eagerly await to be able to lick the spoon and the mixing bowl after she was finished lathering the frosting on the cake.

            I reached out to my mom to discuss making this cake for my class project as well as ask for her help in putting this recipe together.  She found it interesting that, out of all of the different recipes that I could have chosen to make for this assignment, I would choose to make the Chocotorta.  This very simple, no bake cake is the one thing that takes me back to being a child, eagerly hanging around the kitchen waiting for my mother to allow to finally lick the spoon and mixing bowl.

My version of the Chocotorta did not come out as pretty and delicious as the ones my mother used to make.  I think it’s going to take some time for me to perfect the recipe and have it taste as good as my mother’s cake.  Maybe I’ll never make it as good as her and I am truly okay with that.  The upside is that I will keep eating my mother’s Chocotorta as long as she keeps making it.  I will also continue to shamelessly keep calling first dibs on that spoon and mixing bowl.

So, What Goes In The Chocotorta?

            Now that I have gotten your attention about how delicious this dessert is, I will discuss the ingredients that go in to the Chocotorta.  In order to have as many of the original items for the cake, I drove to an Argentinian market located in the City of Redondo Beach.  I was able to find the chocolate cookies, Chocolinas, and the dulce de leche made by the brand La Serenisima.  La Serenisima is my preferred brand of dulce de leche and so I was very happy that they carried this brand.  Unfortunately, the cream cheese made by the brand Mendicrim is no longer available, so I settled for the Lucerne brand.

For my version of the Chocotorta, I mix Kahlua in to the cups of coffee used to moisten the cookies.  This gives it an extra something that was not there in the original recipe.  I also sprinkle ground espresso beans in between the layers in order to balance out the sweetness from the dulce de leche.

Ingredients

  1. 16 oz. dulce de leche (La Serenisima)
  2. 16 oz. cream cheese
  3. 18 oz. chocolate cookies (Chocolinas)
  4. 2 cup freshly brewed coffee/espresso
  5. 1/4 cup of Kahlua

For garnishing

  1. grounded espresso

Dulce de Leche

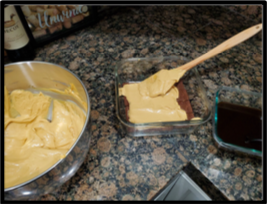
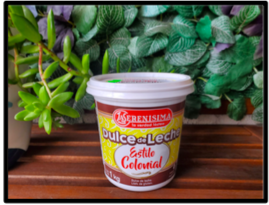
The most important ingredient of the Chocotorta is the dulce de leche.  Without this ingredient, you are unable to have a proper Chocotorta.  My preferred brand of dulce de leche is La Serenisima.  I was able to locate this item from an Argentine market located in the City of Redondo Beach.

Mendicrim

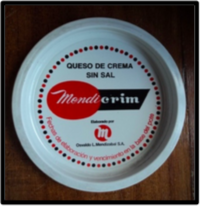
The original recipe called for Mendicrim.  Mendicrim is a type of cream cheese that was made by The Mendizabal Company.   Mendizabal is no longer in operation.  The original recipe was purchased by the SanCor Company.  Sancor currently sells a similar version of the product.

For my recipe, I was unable to obtain Mendidrin, so I utilized the Lucerne brand of cream cheese.  The Lucerne cream cheese worked very well with the La Serenisima dulce de leche.  I was able to locate this item at an Argentine market located in the City of Redondo Beach.

Chocolinas

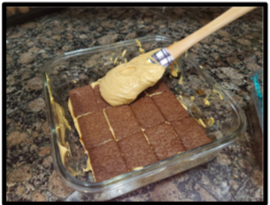
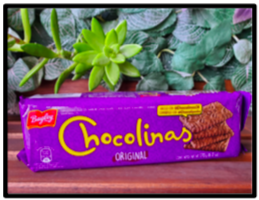
Chocolinas are simple chocolate cookies from Argentina. The cookies are not very great on their own. The cookies are chalky, dry, and leave crumbs everywhere; however, they are the perfect cookie for this recipe.  I was able to locate this item at an Argentine market located in the City of Redondo Beach.


Coffee

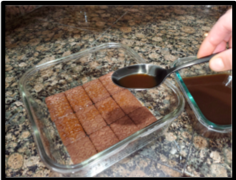
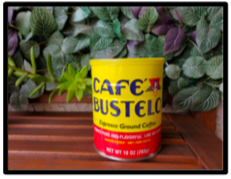
Coffee is also another very important part of this recipe.  It helps balance out the sweetness of the dulce de leche.  The coffee is utilized to moisten the Chocolinas before layering them into the pan.  You also use the coffee grounds in between the layers of the Chocotorta.  You are able to purchase this coffee at most supermarkets.

Kahlua

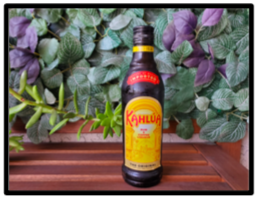
The original recipe did not include Kahlua; however, mine does.  The Kahlua gives it an extra something.  It makes the cake taste extra delicious.  This item is available at most supermarkets.


Directions

Chocotorta is incredibly simple to make. The only ingredients needed are dulce de leche, cream cheese, chocolate biscuits, Kahlua, coffee and a sprinkling of ground espresso.  Different versions of Chocotorta can be created, some use chocolate milk instead of coffee, others prefer to use heavy whipping cream, while others have their own favorite cookies to use.

Instructions

  1. First, the dulce de Leche (I personally prefer La Serenisima) is mixed with the cream cheese in equal parts (I used 16 oz of each for this recipe) in a large bowl.  I would recommend using an electric mixer until smooth. Make sure that the mixture is not lumpy. Put the frosting aside once you finish mixing.
  2. In a small bowl, mix the coffee with the Kahlua.
  3. The chocolate biscuits are then soaked in the coffee/Kahlua mix.
  4. Once the chocolate cookies are fully soaked, arrange them in a rectangular mold, forming a single layer, covering the entire surface of the mold.
  5. Next comes a layer of the dulce de leche/cream cheese combination.  Make sure to slather it onto the layer of chocolate biscuits.  Spread evenly with a spatula.
  6. Arrange another layer of the moist chocolate cookies.
  7. Add more of the dulce de leche spread.
  8. Make sure to sprinkle some of the ground espresso in between the layers.
  9. You should repeat this process until it reaches your preferred height.
  10. For garnishing, sprinkle the ground espresso over the last layer of dulce de leche.
  11. Cover with plastic film and refrigerate overnight. It is really important to refrigerate for at least 8 hours.  The Chocotorta needs to set in the fridge in order for the layers to merge.

Notes

  1. You can substitute the coffee mix for chocolate milk, especially if you are preparing it for children.

After waiting for what seems like an eternity (8 hours), you may take the cake out of the refrigerator and cut yourself a slice of heaven.  You can enjoy your piece of Chocotorta with a glass of milk, or as I do, a nice cup of espresso.


References:

An Argentinian Classic: Chocotorta. (2015). Retrieved from https://www.elebaires.com/an-argentinian-classic-chocatorta/

Chocotorta. (n.d.).  Retrieved from https://www.tasteatlas.com/chocotorta

Chocotorta. (n.d.).  Retrieved from https://es.wikipedia.org/wiki/Chocotorta

Chocolinas? Forgettable: Chocotorta? Extraordinary. (2019).  Retrieved from https://heated.medium.com/chocolinas-forgettable-chocotorta-extraordinary-c2a0b79242fd

Chocotorta – The Real Argentine Dessert. (2016).  Retrieved from https://vamospanish.com/discover/chocotorta-the-real-argentine-dessert/


Jesse’s Banana Nut Chocolate Chip Muffins

Thinking of my first connection to banana nut bread takes me back to high school where I took Home Economics and learned the basics in cooking and baking.  The simplicity of making the recipe along with the smell and delicious taste of the bread made it my favorite bread instantly.  The banana nut bread recipe has changed throughout the decades with new versions that were made adaptable to the time period and creative inventiveness, but the thing that remains constant is the sweet taste of the ripe bananas that is present in all the recipes.  As for my recipe, I incorporated chocolate chips at the request of my then six-year old son.  Additionally, for practicality reasons, I opted to make muffins instead of the traditional loaf.  The recipe was a hit and I have been making banana nut chocolate chip muffins for many years now. With the posting of this recipe, I have decided to name the muffins after my son, Jesse, who inspired this version of the recipe.

History of Banana Bread

The making of banana bread emerged during the Great Depression with the 1929 stock market crash, when the need to make the most of every scrap of food was eminent and throwing away over ripe bananas was not an option.  Out of the need to preserve and make use of these bananas evolved incorporating bananas into bread.

According to PJ Hamel’s article, “A Short History of Banana Bread,” the rise in popularity of banana bread also came with the invention of baking powder and baking soda in the 1930’s.  Before then, housewives used pearlash.  Pearlash is a refined form of potash, and it produces carbon dioxide gas in dough (FoodReference.com) Soon after banana bread recipes started to appear in cookbooks. Pillsbury’s Balanced Recipes cookbook is credited as featuring the first banana bread recipe. This led to more recipes and varieties of the bread, many with the inclusion of nuts and other different ingredients and spices.

Banana nut bread is still a staple to this day and is very much a comfort food.  Simple to make using basic ingredients that are found in just about any kitchen, this bread is a must try for anyone and is sure to be a regular addition to your baking list.

Varieties, Evolution through the Decades

The making of banana bread has changed and evolved throughout the decades.  Hamel explains the changes over time in his article, starting, with the 1930s, where the use of wheat bran was incorporated in the recipe.  Bran was an inexpensive bulk filler. In the 1940s, the recipes for banana bread use one less egg and called on sour milk or buttermilk. The 1950s, emerged the use of nuts in the loaves and the bread was low-fat, low-sugar, less bananas and un-spiced.  Probably, not too tasty.  During the 1960s through the 1970s, the incorporation of vanilla, almond, orange, nutmeg, and even coffee made it to some recipes, making this bread very fragrant and tasteful.  The 1980s brought a whole wheat flour into the recipe and the increase use of butter.  The 1990s was a decade where many people used food as “creative expression.”  As such, recipes from that era called for well balanced flavors and a moist texture, with the use of spices such as cinnamon and nutmeg.  And finally, to our current decade, the 2000s.  A time when more than ever, people are being more mindful about what they eat and strive be fit and trim.  The recipes I’ve seen online recently call for less sugar, less nuts, and include other types of sweeteners, like honey and stevia.

 Bananas Nutritional Facts

According to the online website Healthline, a medium sized banana contains:

  • 89 calories
  • 75% water
  • 1 grams of protein
  • 8 grams of carbs
  • 2 grams of sugar
  • 6 grams of fiber
  • 3 grams of fat

Bananas are a good source of potassium and are high in vitamin B6 and C. (Arnarson, May 2019). They are great for quick snacks or breakfast on the go.  They are practical, low fat, and easy to tote around which make them perfect for the fast lifestyle we all currently find ourselves in.

Walnuts Nutritional Facts

According to the online website Healthline, a one ounce serving of walnuts (about 14 halves) contains:

  • 185 calories
  • 4% water
  • 3 grams of protein
  • 9 grams of carbs
  • 7 grams of sugar
  • 9 grams of fiber
  • 5 grams of fat

Walnuts are an excellent source of vitamins and minerals including copper, folic acid, phosphorus, vitamin B6, manganese, and vitamin E. They contain a high percentage of omega-3 fat and is made up of protein and polyunsaturated fat (Arnarson, March 2019). Consuming walnuts has many health benefits including decreasing heart disease (when combined with healthy lifestyle habits), cancer prevention, and can improve brain function.  Walnuts, when eaten in moderation, are a great snack and a great alternative to potato chips and other non-healthy snack foods we tend to reach for.

Fun Facts

Some fun and interesting facts about bananas and banana nut bread include:

  • February 23rd is National Banana Bread day
  • Banana nut bread is a quick bread (as it contains no yeast)
  • Pillsbury’s Balanced Recipe cookbook published the first banana bread recipe
  • Banana bread became more widely accepted when a recipe appeared in the Chiquita Bananas recipe book in 1950
  • There are over 1,000 varieties of bananas, grown in more than 150 countries
  • Bananas are not only yellow. There are pink and even blue bananas!
  • Bananas come in different shapes and sizes

Recipe Ingredients

1 ¼ cups sugar

½ c butter or margarine, softened

2 eggs

1 ½ cups mashed very ripe bananas (3 to 4 medium)

½ c buttermilk

1 teaspoon vanilla

2 ½ cups flour

1 teaspoon baking soda

1 teaspoon salt

½ cup chopped walnuts* (see note)

½ cup chocolate chips

Instructions

  1. Heat oven to 350°. Grease (or use cooking spray) sides and bottoms of muffin tin or use cupcake/muffins and omit the greasing or using spray.
  2. Cream sugar and softened butter in a large bowl.
  3. Add eggs, mashed bananas, buttermilk and vanilla. Beat on medium speed with electric mixer until smooth.
  4. Stir in flour, baking soda, salt, chopped walnuts and chocolate chips until moistened.
  5. Carefully pour batter into muffin liners (I like to add extra chips on top).
  6. Bake muffins for twenty minutes or until a toothpick inserted in the center comes out clean. If needed, return to the oven for one or two more minutes. As all ovens are different, adjust time accordingly.
  7. Cool for approximately ten minutes.
  8. Enjoy.


Some notes before you begin: it’s best to gather all of the ingredients before you get started and measure everything. In particular, make sure the walnuts are chopped and the bananas are mashed before you begin your recipe.  I use a regular knife and cutting board to chop the walnuts, but I am sure you can use a food processor, if you have one, for this step.  This way, you will be able to add your ingredients seamlessly. I use a fork in step two to combine the softened butter with the sugar.  It is important that the butter and sugar are creamed completely.  You can use an electric mixer or a KitchenAid for step three. I use a spoon on step four when combining the dry ingredients-flour, baking soda, salt, nuts and chocolate chips together .  I carefully stir and fold.  Ensure the batter is completely moistened and mixed before going to step five.  It’s also important not to over stir.

You can use an electric hand mixer

Additional note: you can omit the chocolate chips and double the nuts in the recipe.  I always make one batch of with nuts and chocolate chips and another batch just nuts.

The walnuts can be used straight from the bag or can be toasted, cooled and then chopped for an enhanced flavor and texture.  Walnuts can be toasted in the oven or on the stove. Toasting walnuts is easy to do and will add a rich tasting flavor to your muffins. Although not necessary, I highly recommend this step.

or a KitchenAid

Toasting Walnuts

Instructions for toasting walnuts in the oven:

  1. Preheat oven to 350º. Line a rimmed baking sheet with parchment paper or foil.
  2. Arrange walnuts in a single layer on lined baking sheet.
  3. Toast for approximately 5 to 10 minutes, until browned and fragrant, stirring occasionally.
  4. Remove from oven, let cool, then chop or use as desired.

Instructions for toasting walnuts on the stove:

  1. Toss walnuts in a medium skillet over medium heat.
  2. Heat walnuts until browned and fragrant for about 2 to 5 minutes, stirring occasionally.
  3. Remove from skillet, let cool, the chop or use as desired.

I often bake these muffins and take them to work for meetings or just as a “pick me up” at work for my staff to enjoy with coffee.  To this date, I still have family members who give me their over ripe bananas and ask me to make muffins for them.

Through the years, I’ve always enjoyed baking, and making these banana nut chocolate chips muffins are probably the item I bake the most. I especially love to bake in the fall and winter and during cold nights as the oven warms up the house.  Additionally, nothing beats the smell of bread baking in the oven.  The smell is so welcoming and to me evokes the memories I have associated with my family.  I especially like the simplicity in making these muffins and their delicious taste.  The buttermilk is an important component in this recipe as it is what makes the muffins so moist.  The next time you are looking for an easy homemade muffin idea, I invite you to make my delicious banana nut chocolate chip muffins and hopefully they will be part of your family’s memories as well.

References:

Arnarson, Atli. (2019, May 07). Bananas 101: Nutrition Facts and Health Benefits. Retrieved from Healthline: https://www.healthline.com/nutrition/foods/bananas

Arnarson, Atli. (2019, March 26). Walnuts 101: Nutrition Facts and Health Benefits. Retrieved from Healthline:https://www.healthline.com/nutrition/foods/walnuts

Banana Bread History. Retrieved from Food Reference.com. http://www.foodreference.com/html/artbananabrd.html

Hamel, PJ. (2017,02,23). A Short Story of Banana Bread. Retrieved from King Arthur Flour: https://www.kingarthurflour.com/blog/2017/02/23/short-history-of-banana-bread

Stephens, Emily. (2018, May, 16). 7 Fun Facts About Bananas and Banana Bread You Didn’t Know.  Retrieved from My Great Recipes: https://www.mygreatrecipes.com/blog/7-fun-facts-about-bananas-and-banana-bread-you-didnt-know/

Nani’s Spaghetti Sauce

A Little Sauce History
Whether it’s pasta with red, white or butter sauce, I think everyone will agree that Italian is a good old-fashioned comfort food! There are a couple names given to spaghetti sauce; Italians with roots straight from Italy call spaghetti sauce; ragù, sugo and salsa.  American Italians from the East Coast call it “gravy” as discussed in Lorraine Ranalli’s book, Gravy Wars: South Philly Foods, Feuds & Attytudes.  One thing is for sure, that Italians don’t have word or use “gravy” in Italian.  Italians only say salsa, or ragù or sugo, which mean “sauce,” regardless if it contains meat or not.

The differences:

Ragù implies that the sauce was reduced, i.e. the flavors are concentrated, and the ingredients are usually cooked for a long time. The resulting sauce is used to dress pasta, fregola, polenta, rice.  The Italian expression ‘ragú’ is derived from the French ‘ragout’-it is a thick stew of meat, poultry or fish with or without vegetables.

Sugo is often used interchangeably with ‘ragú’- different regions of Italy prefer one term above the other, but generally a ragú is cooked on low heat for a long time and the flavors are concentrated.

Photo by C.Gonzalez

Salsa or Pomodoro Salsa is an alternative to a long cooking sauce.  This simple type of spaghetti sauce is made with very few ingredients; fresh tomatoes, olive oil, garlic, onion, and fresh herbs (such as basil, oregano, and parsley) with a pinch of salt and pepper.  There is no meat or vegetables are added to this sauce.  This is an easy, fragrant and perfect summer sauce poured over any pasta.

Fettuccini Alfredo sauce is a big Italian myth along with its most famous use in Fettuccini noodle. The name “Alfredo sauce” is almost completely absent in Italy.  However, there are plenty of pasta sauces which are similarly based on the combination of butter and Parmigiano that are known as “al burro” with butter. In Rome, egg noodles with butter and Parmigiano are often called “alla Romana”, Roman style.

Did you know…

  • A little history behind Fettuccini Alfredo is a bit of a mixed legend. In 1914, Alfredo di Lelio, a Roman restaurateur who was popular among American tourists, named his butter and cheese linguine after himself. According to the legend, the dish caught the attention of early Hollywood actors Mary Pickford and Douglas Fairbanks, who were in Rome for their honeymoon. When they returned to the US, the actors introduced the dish to their Hollywood friends, making it famous. In 1943 Alfredo di Lelio sold his restaurant, but the new owner kept the menu and is still in business under the name “Alfredo alla Scrofa“. In 1950, Alfredo di Lelio and his son opened a new restaurant in a different location and called it “Il vero Alfredo“, the real Alfredo, which is now managed by Alfredo’s nephews. Both restaurants are popular with North American tourists that want to taste the original Alfredo recipe. Besides these two restaurants, in Italy, “Alfredo” is just a first name (Alfred).
  • Spaghetti with meatballs is an American invention. Yes, that right, only American Italians eat their spaghetti and meatballs.  If you ever get the opportunity to visit Italy, NEVER ask for spaghetti and meat balls. Spaghetti and meatballs are practically non-existent in Italy, instead, meatballs are eaten together with a side dish of  some type of vegetable or salad on their own.  There are  many variations of meatballs or as the Italian call them ‘polpette’, are found almost everywhere in the Italy. As the Italians assimilated into the American culture, they also began to switch to a large single course (as opposed to multiple smaller courses). This resulted in the combination of spaghetti and meatballs in a rich tomato sauce, which turned into the iconic dish we all know today; spaghetti and meatballs.
  • When it comes to cuisine, Italians take things quite seriously. The main meal of the day occurs at lunch, also known as il pranzo, or ‘the lunch’. This mean starts with antipasti, commonly referred to as appetizers in America. Antipasti consists of hors d’oeuvres such as olives, cheese, and salami. The first course, il primo, follows with delights such as pasta, or minestrone; a type of soup. Afterwards, il secondo, and the main course, arrives. Meat, fish, and a vegetable-dominated salad are served during this period. To conclude the overall meal, fruit, dessert, and espresso are served.

My story

I grew up on the Eastside of  Los Angeles with my big Italian family.  Most of our family lived within a block and a half radius from each other.  As I grew into a young girl, I hung out in the kitchen with my mom, aunts, and grandmother; where life was shared, and recipes were passed down over the years.  Understanding who we are and where we came from is important in how we pass down those special traditional dishes.  My sisters’ brother, and I are first generation born here in the United States.  My grandparents and my parents, and their siblings were all born back in Italy.  At times it felt like a little Italy when were all got together, which was all the time.

The one dish I loved the most was my grandma Nani’s pasta with red sauce.  This was our family favorite dish and still is.  We all knew when she was cooking her sauce because we could smell it while we all played outside.  The smell of simmering spaghetti sauce still takes me back to the great days of when we would all run it and fight for a seat about the table to eat her pasta with meatballs. Tutti a tavolo (everyone to the table)! Is something my grandma and mom call out when our meal was ready.

But, aside from my family, our neighborhood, especially on my block; there were families of various nationalities; Polish, Japanese, German, but majority were Mexican.  I loved growing up and hanging out at each other’s houses.  That’s how I was introduced to spicy Mexican food.  I love the heat of the spicy peppers.

When I got married and had a family of my own, I learned how to make my mother’s spaghetti sauce.  I wanted them to enjoy that rich flavorful taste that I grew up with and loved.  As the years passed the recipe took on a new tradition; my new tradition.  I tried to stay as close to their recipe as possible but growing up on the Eastside of Los Angeles my taste for spicy foods became a part of my life which extended into my cooking the kitchen.  Not only did my taste change my life did as well.  When my household went from a two-parent household to a one parent household, which meant I had to cut down on meal preparation time to cooked meals for my kids.  As a single working mom, with two kids, homemade spaghetti sauce and meatballs from scratch was a very time-consuming process and I had to restructure and prioritize my time.  I found that some canned tomato sauces had good flavor and began to use them in my sauce.  One weekend was making my sauce and did not have enough canned diced tomatoes so I decided to substitute one can with RO*TEL green chilies. My kids also like spicy food so this was a bit of an experiment as I did not know how my kids would react to this little surprise.  I served it to my kids, and they loved it.  Now, I know it would have to pass the “mom” test.  I invited my mom over to sample my “new and improved” sauce, and much to my surprise my mom loved it.  As a matter of fact, my mom and sister use my recipe when they make their Sunday dinners or when we have our family get together, they always ask me to bring the pasta with my sauce.  Maybe this easy recipe will inspire you to create your own new traditions.

Ingredients

1 – 24 oz. can Del Monte  or Hunt’s Tomato & Basil Pasta Sauce

1 – 14 oz. can Del Monte Diced Tomatoes with Basil, Garlic & Oregano

1 – 10 oz. can RO*TEL Original Diced Tomatoes with Green Chilies

6-10 large leaves of fresh basil, torn, or 1 Tbsp. dried basil

1 tsp. dried oregano or Italian seasoning (optional)

Salt and pepper to taste (optional)

10 – 12 Meatballs (Costco or any type of cooked meat)

1 lb. pasta or spaghetti

Grated Parmesan or Pecorino Romano cheese

Directions

  1. Photo by C.Gonzalez

    In a medium/large saucepan pour in the canned pasta sauce, diced tomatoes, and the RO*TEL green chilies, Basil or you favorite Italian spices, and simmer on a medium heat.

    At this point you can add in the meatballs or half cooked sausage (I usually partially cook them in the microwave to cut down on the cook time) into the simmering tomato sauce for 30 – 40 mins.  Until the meats are completely cooked.

  2. Bring a large pot of lightly salted water to a boil. Cook pasta in the boiling water, stirring occasionally, until cooked through but firm to the bite, according to the direction on the package. Drain.
  3. Stir tomato mixture into pasta and season with salt and pepper. Toss warm pasta with Grated Parmesan or Pecorino Romano cheese to taste cheese in a large bowl.

The nutritional benefits of spaghetti sauce:

Photographer unknown

If you’re like me and don’t have a lot of time and the inclination of how to make your own pasta sauce there are some types of canned pasta sauce are relatively healthy.  Check the fat, sugar, sodium and calorie contents on the nutrition facts label to find the healthiest variety of the type of sauce you are considering.  Red sauces are low in saturated fat and all offer plenty of vitamins A and C and lycopene, an antioxidant. Adding extras such as cheese, meats, and cream add calories, salt and saturated fat.  Look at the daily value percentages too. A daily value (DV) of 15 per cent or more for vitamins A and C mean that one serving is a good source of those nutrients.

One last tip: Although nutrition information typically provided for 1/2 cup of pasta sauce, most people pour at least one cup on their noodles. So you’ll need to double the numbers.

References:

Author, Speaker, Voice-over. (n.d.). Retrieved from http://lorraineranalli.com/

Bowen, D. (n.d.). Ragù Around Italy. Retrieved from https://www.saveur.com/article/Kitchen/Ragu-Around-Italy/

Duggan, T. (2012, January 20). SEDUCED BY SUGO / Long-cooked Italian sauces captivate chefs and diners. Retrieved from https://www.sfgate.com/recipes/article/SEDUCED-BY-SUGO-Long-cooked-Italian-sauces-2647395.php

Blair, Blair, Wallace, W., Finkle, J., Sullivan, R., Sheila, … Chelsea C. (2019, May 27). 5-Ingredient Pasta Pomodoro Sauce. Retrieved from https://www.theseasonedmom.com/5-ingredient-pasta-pomodoro-sauce/

Ristorante di Roma – Alfredo alla Scrofa. (n.d.). Retrieved from https://www.alfredoallascrofa.com/chi-siamo

Il Vero Alfredo “The Real Alfredo”. (n.d.). Retrieved from http://www.ilveroalfredo.it/index-eng.htm

The Advantages of Tomato Sauce. (n.d.). Retrieved from https://www.livestrong.com/article/522521-the-advantages-of-tomato-sauce/


My Family Ceviche

What does a young wife cook for her husband when she has no idea how to cook? That was the major reason why I did not want to ever get married. I was never one of those girls that dreamed about getting married one day. In fact, I often joked about how I would never have kids, have a dozen boyfriends, live on my own by the time I was 21, and about how and if  I ever got married, I was going to have a maid and a housekeeper to run my house because I would be rich one day. That was far from my reality by the time I was 22 years old. Here I was, 22 years old, newly married, and no idea of how I was going to make things work. I knew there would be no way I could fake it. I had run away from the kitchen my whole life, and now there would be no turning back and I was petrified to tell my new husband that he would either starve or have to learn to cook for himself. Lucky for me things worked in my favor since the day after my wedding.

Our first honeymoon location was in Mazatlán, Culiacan, Mexico. We had room service and cocktails on the beach and it was wonderful. Our next stop would be the real test. My husband decided we would go to Sinaloa, Culiacan, Mexico because his father lived there and he had not made the trip to the United States for the wedding.  When we arrived to his father’s house, we rang the doorbell and he yelled from somewhere in the back of the house. “I’m back here!”. We went towards the back yard and he was sitting on a chair with a table full of ingredients I recognized. Red onions, cilantro, cucumbers, tomatoes, fresh jalapeños, avocados, tostadas, shrimp and octopus. We were making ceviche, the one dish I knew very well.

I grew up with a single mother and every time she went in to the kitchen to cook, she would ask me to go help and I refused because I felt like I had no business in there. My mother was not fond of cooking either so she would typically make dishes that were quick and easy and her idea of a fancy meal was cheese enchiladas topped with cotija cheese and pickled onions, with a side of whole pinto beans and sopa de arroz (Mexican rice). Although we are Mexican, she rarely kept tortillas in the house, so the tortillas were a real treat.

But sometimes there was work to be done in the kitchen because we were going to have guests. This meant, ceviche de pescado (fish). This was her go-to meal for serving up something extra special, but it required help from everyone. My sisters and I chopped the vegetables while she cut up any type of white fish that was on sale and we all got to feast with our family guests. Now, I was a guest at my in laws’ home.

I felt a huge sense of relief because I knew my role immediately when I saw the spread of ingredients that my father in law had for us.  In that afternoon, I learned that ceviche was my husband’s favorite meal and that I was already an expert at making it. Through the years, making ceviche became a family tradition in my home. Whenever there is a special occasion or at my children’s request, we sit at the table, grab a knife and chop away at the ingredients to make a delicious ceviche, as a family.

The recipe consists of 4 lbs. or medium shrimp which will need to be peeled and deveined, and finally washed thoroughly.

You will need 2 small cans of baby clams and save the juice of one of the cans:

Next you will need to dice the shrimp and place in a bowl along with the baby clams and the juice from one of cans and put to the side while you prepare your vegetables

You will need the following vegetables:

5 small diced tomatoes

4 diced fresh jalapeños

1 seeded sliced cucumber

1 diced large red onion

1 chopped, small cilantro bunch

1 tablespoon salt

Dash of pepper

5 juiced lemons

8-10 juiced limes

Mix the juice of lemons and limes. Use about ¾ the juice to pour over the shrimp and baby clams. The remainder should be placed in another bowl with all the vegetables.

The next step is to leave the shrimp and baby clams, and the mixed vegetable soaking with the lemon and lime juice mixture in the refrigerator for at least 4 hours.

The final step is to mix all the ingredients into one bowl and add the salt and pepper:

Enjoy as an appetizer or main dish on a tostada or with tortilla chips.

You can turn this recipe into a fun activity with family or friends by getting everyone to help chopping and preparing while talking at the table. It is a great opportunity to sit together and chat.

The day my life hit guac bottom…

The house that I grew up in had three trees: a guava tree, a lemon tree, and my favorite, an avocado tree. This tree was enormous and full of leaves that would provide cool shade during hot summer days but most importantly, it was full of avocados. My uncle, who was a father figure to me, installed my first swing on this tree. In the evenings, I would help him water all the plants and flowers around the tree. Our family would have many barbeques and sit under the tree. Whenever we had guests coming over to visit, it was easy to find our house because of our big avocado tree. Even though I lived in the busy side of the city, being under this tree made me feel like I was in a place of peace and tranquility.

Having a tree that produced something edible and so readily available for me was exciting and I felt like the luckiest little girl in the world! I remember using a long orange fruit tree picker to bring down the avocados which were my absolute favorite thing to do so that we could give them away. We were fortunate to have more than enough. I felt like I was doing hard work and a very important job at the time. We were saving people money, trips to the store, time, and maybe even their health as avocados provide good nutrition. Our tree would produce so many avocados that we would fill countless buckets of them. We had so many that we would give them out to anyone and everyone. People that walked by would ask us if they could get some and we would say, “Yes! Please take as many as you’d like!” and whenever we had guests, we made sure they’d go home with a bag full of avocados. Once, we even had a city inspector make a deal with us that if we gave him a bucket of avocados, he’d write off our citation ticket for having something in our backyard that needed a permit (I forgot what it was exactly).

Our avocados were a good size too; about the size of a softball! As I got older, I started noticing avocados were expensive at grocery stores but since I never had to buy any, it didn’t really bother me at the time. Then about 4 years ago, the unthinkable happened: I had to start buying avocado! Our tree was growing more and more and became a danger to anyone walking on the sidewalk as it was able to fall at any moment. I begged my grandma and the rest of my family not to cut it down because I believed my tree was anything but harmful. Of course, no one would listen and cutting it down was necessary in order to prevent harm. I always thought my personal giving tree would stand forever but after 30 years, it was finally gone.

I remember my grandma tried growing out another one and I would say, “It’s not the same. I don’t want another one. Plus, by the time it grows as big as the last one, I’ll probably be dead”. I was pretty bitter about it and so my grandma just decided not to even bother with planting a new one. Since we no longer had a tree that gave us free avocados, I had to start buying them which to me was so hard to process. I had been getting avocados for free for 20 something years and now I’m paying extra for “guac” at chipotle! It felt unethical to me almost as if the air was being sold to me. Then I’d go to grocery stores and find avocados that were not even half the size of my softball avocados. I would think, “You call this an avocado?!” To make matters worse, avocados seem to always be overpriced.  It’s still something that I’m struggling to accept but I love avocados and so I make the investment and buy them.

One of the main reasons I choose to invest in avocados is not only for their delicious taste but for their health benefits as well. When I started learning more about nutrition, I didn’t know there was such a thing as a “good kind of fat”. The avocado is the only fruit that contains good fat which is good for heart health. Avocados are also naturally free of sodium, sugar, and cholesterol. They can act as a “nutrient booster” by helping increase the way our bodies absorb vitamins such as A and D. Even babies can enjoy this nutritious food. Due to its creamy consistency, it makes the first fresh food for babies to try.


What I really like about avocado is that there are so many ways to incorporate them into everyday meals. Below, I have listed some meals that allow me to get creative with avocado:

  • Avocado toast
  • Egg omelets topped with avocado
  • Buddha bowls
  • Salads
  • and of course, guacamole!


These are just a few dishes that I enjoy eating as each bite takes me back to a memorable time in my childhood. My tree may be gone, but my love for avocado will always remain.


Sources:

https://www.californiaavocado.com/nutrition/nutrients

Alfajores

When I was 8 years old, my father began working for a baked goods company in Argentina.  The baked goods company made every single treat my young little heart could ever dream of.  In my young mind, my father was the equivalent of Willy Wonka.

He was hired by the company as a mold maker.  The molds he made were used to make all of the baked goods.  Per company rules, employees were allowed to indulge in any of the company’s products as long as they did so on the company’s premises.  Employees were not allowed to take any of the goods home without purchasing them first.  If employees were caught taking anything home, they would risk being dismissed from their job.  My dad was so lucky to work there, I thought.  When I was old enough, I was going to work for the same company.

My family’s financial situation was very dire when my father was hired.  My family did not have any money to spare, especially to buy any sweet treats for me.  My father knew how much I loved alfajores, so he would sneak out the sweet treats for me inside his clothes.  Every day, at around 5pm, I would wait patiently for my dad to get home from work.  I would search all over his clothes until I would find the hidden alfajores.  It was our daily ritual until he sadly left the company to come to the United States.

What is an Alfajor?

An alfajor is a very popular sweet treat found in many South American countries.  Contrary to the belief that the alfajor originated in South America, it actually originated in the Middle East sometime in the 19th century.  According to dialectologists, the name alfajor is derived from the Arabic word al-fakher, which means luxurious.

Alfajores are made with two round cookies made of wheat flour or corn starch with different sweet fillings between them. The inside filling is usually dulce de leche and the outside is usually covered in glazed sugar (my personal favorite), coated with dark or white chocolate or shredded coconut.  Argentina is the world’s largest consumer of alfajores.  Alfajores are the most common snack that is eaten by both children and adults.  Alfajores are also very popular in many other South American countries such as Uruguay, Chile and Peru.

Alfajores can be enjoyed at any time to curb hunger between meals or share with friends and loved ones. They can be paired with a variety of beverages and make a delicious dessert after any meal.  Alfajores are one of the best gifts you can give friends and loved ones when traveling to the US from Argentina.  At least, that is the best gift someone can bring me.  As soon as I bite into a delicious alfajor, it transports me back to the days that I would wait for my father to come home from work so that I could search his pockets for my sweet treats.

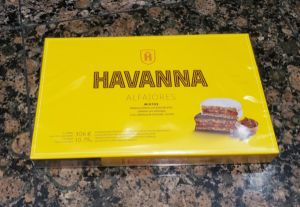
There are many well-known alfajor brands in South America.  My personal favorite alfajor brand is Havanna.  The brand Havanna was founded in 1948 by Benjamín Sisterna, Demetrio Elíades and Luis Sbaraglini in the city of Mar del Plata (a coastal city in Argentina).

The Havanna alfajor is not a low-calorie food.  The nutritional information of the alfajor is as follows:

Nutritional Facts

Serving Size 1 piece

Calories                               205

Calories from fat                     65

Total Fat                               7g

Saturated Fat                          3.9g

Trans Fat                                 0.1g

Cholesterol                          12 mg

Sodium                                 34 mg

Total Carbohydrates            32 g

Dietary Fiber                            0.2g

Sugars                                    17g

Protein                                  3.5 g


The One and Only: LAUSD Coffee Cake

If you grew up in one of the Los Angeles neighborhoods that belonged to the Los Angeles Unified School District (LAUSD), and you were a student at one of the schools within the district from the 1960’s through the 1970’s, you had the opportunity to enjoy cafeteria food that was freshly made by cafeteria cooks on the premises. During this time, you were probably not enjoying the most nutritious food in the world, but quite frankly, homecooked meals during that time were probably filled with equally unhealthy nutritional value. According to an L.A. Weekly online article, LAUSD continues to struggle to provide healthy food lunches for its students (Alimurung, 2011). However, if you were a student during that time period and you lived in homes with one or two working parents or if your family had limited funds for food, then the meals at school were a precious commodity because they would have been the closest thing to an actual homecooked meal. While classes were taking place, there were many dishes that were prepared by the lunch ladies, which were endeared and known on campus on a first name basis.  They made chimichangas, peanut butter cookies, French bread pizza, hamburgers and French fries, but out of all the dishes that they conjured up, none reigned supreme such as the coffee cake.

This was evident when about nine years ago one of my Facebook groups, dedicated to the Boyle Heights neighborhood area of Los Angeles appropriately named, You Know You Are From Boyle Heights When….,  was in a frenzy with comments with excitement about the rare and special treat that many of us had the pleasure to enjoy as children. Someone got a hold of the original Old-Fashioned Coffee Cake -1954 recipe and posted it online

.

Many of my online friends reshared the recipe directly with me and also reshared it with the list of their own friends or publicly for the world to see. This was such a great surprise to my online friends and to me because we never imagined that the recipe existed. I asked myself, could this actually be the real deal? How did someone get a hold of the recipe? I must admit I had the urge to try baking it, even though I rarely bake, because I did not want to miss the opportunity to get a slice of the sweet treat. Then I had to ask myself, in a world filled with so many specialty coffee/bakery shops, gourmet bakeries, and access to a world filled with online recipes to bake just about anything we can imagine and crave, why did we all get so excited to read about the recipe?

As I continued to read through some of the comments on my Facebook feed, one common theme stood out to me about my friends and the friends of my friends.  We all lived and shared childhood memories from several neighborhoods, spanning decades, and the common connection bringing us together were our childhood memories that included the coffee cake. Some of the comments on my friends feed were as follows:


“Some of my best memories growing up were having the cinnamon, buttery treat for breakfast”


“This was the best ever and I haven’t had anything better since”


“I remember scraping up the last of my change to be able to buy a coffee cake and remembering that it was so worth it”


“Having the coffee cake was the best part of my day growing up”


“For real, I remember buying other kids’ piece because 1 wasn’t enough. I sure would pay now for a few pieces”

“Nothing tastes as good as childhood, thanks for the memories!!!”


“Someone asked me if I knew what LAUSD coffee cake was? I almost fainted”


We all seemed to have wonderful memories about the experience of looking forward to eating the coffee cake made on location at one of the many schools located in the L.A. area anytime between the 1960’s to the early 1980’s. Then as I read more comments, I grew more curious about what I was reading and I began searching the internet for more information about the validity of the recipe and I found a blog that made mention of the coffee cake and the memories it brought to so many.

Author Jen Jenk posted a blog on Devourtheworld.com about the coffee cake recipe on November 30, 2009. Jenk stated, “It was our go-to snack/breakfast during recess. You know…back in the day when calories didn’t mean anything because you could burn it off simply by breathing” (Jenk, 2009). Simply put, this coffee cake was enjoyed by everyone as carefree children. A user named Lolly writes: “I am a product of the LAUSD edu-machine (Eagle Rock High School) and this coffee cake was about the only thing enjoyable about that time” (Jenk, 2009). Another user named Roxie Johnson writes, “In junior high I would always ask for seconds. And yes, it was that good” (Jenk, 2009). A user by the name of Whiteg even cited that the coffee cake was “the only reason he/she attended school” (Jenk, 2009).  This recipe seems to be unforgettable and the name is instantly recognizable. It is clear that the mere mention of the LAUSD coffee cake brings about good memories for everyone, including my own family.

I began a conversation with my husband about the coffee cake and his first response was, “I used to fight for it in school”. I could not believe what I was hearing and when I asked why, he went on to explain that the neighborhood he grew up in was really poor and that no one was willingly going to give up the extra special treat. Therefore, him and his friends would challenge each other to fight one another in order to win an extra slice. My husband grew up in one of the poorest neighborhood areas in Boyle Heights named the Estrada Courts housing projects. His mother was single and struggled to keep food on the table and a stable rood over his head.  I believe that, like most of us, he finds it difficult to talk about the tough times during his childhood because quite frankly, it’s probably hurtful. He told me that when he thinks about his childhood memories, he tries to focus on the good parts and for him, the good parts include the food lunches he enjoyed during his childhood and the company of his schoolmates- even though he fought with some of them.

I grew up in Boyle Heights, California and I attended grade schools in the LAUSD until 1988. I grew up with a single mother and two younger sisters, each 11 months apart. My sisters and I were very close and my mother raised us with very “old school” ideas. She arrived to the United States, from Mexico, in 1968 and she refused to fully adopt new ideas, basically American ones, of child rearing. My mother was very controlling, when we were kids; she had us attend church daily at 7:00 A.M., we needed to complete daily chores, get good grades at school and at home we only ate for sustenance in order to avoid practicing gluttony. Of course being little girls, we did not understand her “crazy ideas” and we blamed her backward ways on the fact that she was from Mexico and that if we listened to her, we would be crazy just like her and we wanted desperately fit in with all of the other kids at our school. By the time I was in the third grade, I realized that there was a loop hole in her plan to control us; the schooltime lunches. My mother worked a lot and she did not have time to pack us lunches, therefore, she was forced to accept whatever the school served us. To our joy, the school served a wonderful, sinful, warm, cinnamon, sweet treat that we would have never, in our wildest dreams, enjoyed at home because it was too good! Whenever the coffee cake was baked at our school, you would be able to smell the butter, soft bread, cinnamon, and the nutmeg from the minute you stepped onto the school grounds. My sisters and I knew for a fact that if our mom knew how good and scrumptious the coffee cake was, she would have forbidden us from eating it, so we enjoyed every bit of it, every chance we had.

I thought about what the coffee cake meant to my sisters and me so when I decided to write about the recipe, I shared it with them. My sisters instantly remembered the sinful enjoyment of the coffee cake. My youngest sister, Ruby, is a baker and when I mentioned the coffee cake recipe, she immediately became excited and wanted to try and replicate the recipe. She offered to bake the coffee cake at her house, with the help of her teenage daughters and she insisted we make a special occasion out of it. She invited my sister Jennifer and me, along with our families. We made a plan to not to tell our children the back story about the coffee cake until we were ready to eat it because we wanted to test their reaction.

First, we bought all the ingredients in the recipe:

Next, we followed the recipe instructions to separate ingredients into different bowls:

Next, we started the longest process which was to slowly mix ingredients in the separate bowls:

Finally, the last step was to pour the batter of mixed ingredients onto the baking sheet, and wait patiently while it baked.

The final product was great.

The smell of the coffee cake was unmistakably familiar. The aroma and the buttery taste of the warm sugar, flour, cinnamon and nutmeg was so comforting and nostalgic. It was like being a kid again. Our family agreed that the coffee cake was delicious but they didn’t understand fighting for it or the buzz on social media. As stated by Alexandra Sifferlin, “Of course, what counts as comfort food is different person to person” (Sifferlin, 2015). My sister and I rejoiced because we got to share a little bit of our childhood and that was truly memorable.

I recalled the special memories of the warm delicious slice of cake and I realized that it is our best version of nostalgia. The coffee cake was special to all of the Facebook users, the blog readers and to my husband for different reasons, however, the feeling of comfort seemed to be the same because the feelings attached to the enjoyment of the coffee cake linked us directly to memories of the best part of our days growing up, including me.


References:

Alimurung, G. (2011, June 16). LA Weekly. Retrieved from WHY LOS ANGELES SCHOOLKIDS GET LOUSY MEALS: https://www.laweekly.com/why-los-angeles-schoolkids-get-lousy-meals/

Jenk, J. (2009, November 30). LAUSD Coffee Cake. Retrieved from Devour the World: One bite at a time, living the experimental life: https://devourtheworld.com

Sifferlin, A. (2015, 07 29). Diet & Nutrition The Science of Why You Crave Comfort Food. Retrieved from Time : https://time.com

Grandma’s Beef Tamales! : }

History

The tamale is said to have been created circa 8000 -5000 BC by the indigenous people of Mesoamerica that started in the Mexican region and spread to Guatemala and the rest of Central American (khanacademy.org).

The tamale was created by the Olmecs, Toltecs, Mayans, and Aztecs who considered themselves the people of the corn. They all ate and used tamales for rituals and festivities. It is said that the tamale was created to be a meal on the go as well and used while traveling long distances. Wrapped in corn husks, it was the ideal meal for the hunter, and the indigenous armies as well. In Mexico, the tamale is usually wrapped in a corn husk while in parts of Central America the tamale is wrapped in a plantain or banana leaf, it depends on what is most bountiful in the region (khanacademy.org).

My family’s history of tamales.
Just like millions of Central and South Americans, my family celebrated the holidays with nostalgic foods such as tamales, pozole, menudo, capirotada (bread pudding), buñuelos a (crispy flour, cinnamon, and sugar pastry), horchata a (cold milk, rice, and cinnamon drink), and champurrado a (hot chocolate corn-based drink). However, what every member of my family anticipated for the holidays was the tamales, both beef tamales, and sweet pineapple and raisin tamales. These two-holiday staples were also on our family’s menu for the holidays. The reason for the tamales being the main dish with so many other items being served was because it was nostalgic to my grandparents, my father, and all my aunts and uncles. The reason for the tamale being nostalgic was because my grandparents had twelve children and feeding twelve children required getting creative with food and with rationing, so she would make very small tamales to feed her family of fourteen. For the holidays my grandmother Elvira, just like millions of other mother cooked tamales. However, my grandmother’s tamales were small but packed with so much flavor. Her recipe is one I have not found anywhere else but in my fathers’ family’s kitchens. My grandmother no longer cooks for the holidays because she now is eighty-five years old. Now, my aunts and my mother have taken the responsibility of carrying on with my grandmother’s recipe and cooking for the holidays.

My grandmother’s tamales were made with beef instead of the more popular chicken. However, I prefer the beef over the chicken tamale any day. She served her tamales with a garlicky red salsa and a cup of hot Champurrado. What makes my grandmother’s tamales so nostalgic is the size of the tamale and how she wrapped them. The tamales looked like little pouches and unwrapping them was like opening a small gift. This was very important to me because as a child my siblings and I did not receive any Christmas gifts. The tamales were like our gifts so unwrapping them was meaningful to us. Coming from a large family was economically hard for everyone around the holidays and having something to eat was a blessing.

Now as an adult the tamale preparing responsibility has fallen onto me. My mother Martha can no longer take on the responsibility of making the tamales on her own because she has carpal tunnel syndrome. Although my mother helps me in making the tamales; it is my responsibility to wake up at 4:00 am on December 23rd of every year to buy masa, corn husks and other ingredients for the tamales. From there I drive to my mother’s house where I start preparing everything for the tamales, from washing the pots and corn husks, to cooking the chilies and beef. The process usually takes about 6 to 8 hours but it’s all worth it.

I am glad to carry on the traditions and responsibilities of making my grandmothers’ tamale recipe. I know my grandmother and parents are proud of me for taking on the responsibility. I can confidently say that I have my grandmother technique and recipe down perfectly.

My grandmother’s tamale recipe was based on the taste preference of using beef instead of chicken. She also says that the use of beef over chicken was due to it being more filling and with too many children to feed, and a couple of beef tamales would make for a hardy meal for such a big family.

The tamale is such a diverse dish in the sense that the ingredients used range from region to region in Mexico. Some regions make cheese tamales, others make sweet pineapple and raisin tamales. In other parts of central and south America, the tamale is wrapped in plantain leaves and stuffed with a softer masa, chicken, and vegetables. One tamale all central and south America share is the corn tamale. This type of tamale can be either salty or sweet. The corn tamale is made of fresh corn puree, lard and salt or sugar to taste. This type of tamale is usually served with a slice of salty cheese or sour cream.
I would say I’m a tamale connoisseur because I have eaten all sorts of tamales. I’ve tried 10 different types of Mexican tamales, 4 types of Salvadorian tamales, 1 Guatemalan tamale and hope to continue to try different types of tamales from all Central and South America.

My husband’s family is also very knowledgeable in making tamales. My mother-in-law makes Salvadorian tamales twice a week, every week. Though my husband’s tamale story is different from my story. His mother started making tamales in El Salvador during the 1980’s civil war. During this period much of El Salvador was going through tough times and finding employment was hard. My in-laws decided to make money by selling tamales in factories and mechanic shops. They developed their recipe from what they could remember from their mothers making tamales. With trial and error, they were able to develop one of the tastiest Salvadorian tamales I have ever tasted, and I have tasted a few.
Though I have been in the kitchen helping my mother in law make her tamales several times, I have yet to record her recipe. I feel that it is my responsibility to keep her recipe going as well, for my husband’s sake, since my mother in law will be retiring soon and plans to move to El Salvador.

To make my grandmother’s Tamales, I usually buy 25 pounds of masa, 3 bags of dried corn husks, 15 pounds of chuck beef, 2 bags of dried California chili pods, 6 garlic gloves, ½ tsp of salt, 1/2 cup of Knorr bouillon,1/3 teaspoon of ground pepper, and 1/4 cup of white vinegar. This amount makes about 75 tamales. However, for the class, I will breakdown the recipe to make 25 tamales.

Grandmas Tamales

Ingredients:

  • 10 Lbs. Nixtamal Masa
  • 1 bag of dried corn husks
  • 5 pounds of beef cut into 1-pound chunks
  • 1 bag of dried California chili peppers
  • 1 bag of dried Guajillo chili peppers
  • 1 onion
  • 6 garlic cloves
  • ½ Knorr bouillion
  • 1 tsp of ground pepper
  • 1/8 cup of white vinegar

Kitchen tools:
You are going to need the following Kitchen tools: a blender, 15-quart pot, large strainer, a 10-quart pot, a large aluminum tray, a 25-quart steamer pot with a rack inside, 2 tablespoons, an electric mixer, and a roll of aluminum.

Preparation:
First, wash your corn husks and leave them soaking in water overnight so that the corn husks are soft and ready to use the following day. Now that corn husks are ready, drain the water and lay them out on your table. Then start cooking your beef in a 15-quart pot. Cook the beef, fill your pot with approximately 7 quarts of water. Place your beef in the pot add 2 garlic cloves, half onion, ¼ cup Knorr bouyon, ½ of tsp salt and ½ tsp of pepper. Cook until tender. Then remove the beef and let it cool. Once the beef is cold shred the beef. Now you’re ready to make the sauce in a 5-quart pot add 3 quarts water. Add the bag the bags of California and Guajillo peppers, 2 cloves of garlic and boil until soft. Then blend the peppers with 2about 2-3 cups of water, 2 cloves of fresh garlic, ¼ Knorr, and 1/8 cup of vinegar. Blend until you get a watery consistency. Strain the Sause and add it to your shredded beef and stir it so the sauce is evenly distributed. Now pour your Nixtamal Masa onto an aluminum tray and with an eggbeater, mix the masa for about 3-5 minutes. This will make your masa’s consistency fluffy when cooked. Place a 25-quart steamer pot with the rack inside and add 2- quarts of water on a chair next to the table where you will be wrapping your tamales. Now you’re ready to wrap your tamales.

Take a corn husk and feel both sides of the husk, the husk has a smooth and a grainy side. You want to place the grainy side on your hand with the smooth side facing you. Then scoop 2 tablespoons of masa onto the smooth side of the husk and spread evenly. Then scoop a tablespoon of beef and place it in the middle of the masa. Then roll one corner of the corn husk toward the other side of the husk, roll into a cone shape. You should have a long strand of corn husk at the bottom. Take the bottom of the husk and fold upward. You should end up with a rectangle shape tamale with one side open. Place each tamale into the pot with the opening face up. Do this as your wrapping each tamale. Once you are done place corn husks on top of your tamales, inside the pot and cover the top of the pot with aluminum foil. This will help in the steaming process so that your tamales are evenly cooked and moist. The husks help the steamer retain water as vapor and will cook the masa. Place your pot on the stove and cook on high until the water boils and you see steam. Then bring down the heat to low and cook for 2 hours. Make sure that the water does not dry, or your tamales will burn. Once the two hours are over, turn off the flame and let the tamales cool before you can serve your tamales.

My family makes a green tomatillo salsa to serve with their tamales. Here is to make the salsa verde.

Salsa Verde:
• 1- pound of green tomatillos
• 2 serrano peppers
• 1- clove of garlic
• 1- Cilantro
• ½ tsp Salt
• 1/8 tsp pepper
• 1/8 onion

First, add 1-quart of water to a 5-quart saucepan and add the tomatillos, serrano peppers, and onion to the water and bring to a boil. Boil until both the tomatillos and peppers are soft. Then pour the tomatillos and serrano peppers into a blender and add 1 clove of garlic and salt and pepper. Blend for 15 seconds or until it’s a watery consistency. Pour the sauce into a bowl and chop about 1/8 cup of cilantro and 1/8 onion and add these to the sauce. Now you are ready to eat your tamales with salsa Verde.

Photos:
The photographs posted are of both Mexican and Salvadorian tamales and the tamale-making process. Here you can see my mother in law making her delicious Salvadorian tamales. I decided to include pictures of her making her chicken tamales because it is very meaningful to her that I share her family’s traditions. I must say that making her Salvadorian chicken tamales is much more complicated than making the Mexican tamales. She was thrilled to know that I included her tamale traditions in my assignment. She told me that she would not mind sharing her recipe, but it was so complex to put into writing, so I decided to share my family’s Mexican tamale recipe.

References

Merguez- Sharpnack, Yvette. Tamal Dough (Masa para Tamales) +video. November 25, 2019
https://muybuenocookbook.com/tamal-dough-masa-para-tamales/

https://en.wikipedia.org/wiki/Nahuatl
https://en.wikipedia.org/wiki/Champurrado

Dr. Kilroy-Ewbank, Lauren. Khan academy Mesoamerica, an introduction
https://www.khanacademy.org/humanities/art-americas/beginners-guide-americas/a/mesoamerica-an-introduction
https://www.bonappetit.com/story/what-are-tomatillos

Cartwright, Mark. Ancient History Encyclopedia, Toltec Civilization. April 27, 2018.
https://www.ancient.eu/Toltec_Civilization/
https://www.history.com/topics/ancient-americas/maya

https://www.ancient.eu/Olmec_Civilization/

https://www.britannica.com/topic/Aztec

ENCYCLOPÆDIA BRITANNICA
https://www.britannica.com/place/El-Salvador/Civil-war
https://en.wikipedia.org/wiki/Capirotada
https://www.isabeleats.com/mexican-bunuelos/

https://en.wikipedia.org/wiki/Guajillo_chili

https://wholespice.com/blog/california-red-chile/https://wholespice.com/blog/california-red-chile/


Agua Chiles

Lent, seafood and my papa’s agua Chile

Lent is described as a 40 day remembrance period that honors the time that Jesus Christ spent fasting in the desert, in which he endured temptation by Satan. In commemoration of Christ’s fasting and sacrifice, Christians across the words observe lent by fasting, praying, giving up something they enjoy and eating a special diet for the duration of 40 days of lent. One of the traditions of lent is eating seafood. My family observes lent by fasting and praying on Fridays. Usually, my family fast during the early part of the day and offer their fast in prayer as a sacrifice before they serve and eat dinner. The menu on Fridays during lent usually consists of a seafood dish such as agua chiles, seafood cocktail, fried tilapia, and seafood soup. On the last day of lent my family would usually celebrate by going out for dinner at a seafood restaurant.
My husband’s family’s lent tradition is usually observed by not eating beef, chicken or pork on Fridays for the duration of lent. His family concludes by having a traditionally big seafood dinner that includes eating fish soup, but this soup is not just any fish soup. It is made from dried fish with id battered with flour, egg, spices and boiled in a broth. Other dishes served during the end of lent are paella and shrimp ceviche.
One of my childhood memories involves eating seafood with my father and uncles. Before my dad’s family became evangelical, they would often drink and to get rid of their hangover my father and uncles would cook different seafood dishes. One of my favorite dishes my father and uncle would prepare is agua chile. I decided to share this dish with the class for my presentation because it’s easy to prepare and does not need to be heated to serve.
The way my family usually prepares agua chiles for about 20 people is by using 5 pounds of washed, peeled and deveined shrimp, 2 cilantro, dicing 8 cucumbers into small pieces, 5-8 serrano peppers, slicing 4 red onions and squeezing 8 pounds of limes which will produce about one litter of lime juice. First, slice the shrimp in halves and place the shrimp in a large bowl. Then blend about 2 cups of lime juice with 5-8 serrano peppers, one cilantro, and one eight red onion. The consistency of the sauce should be watery. Add the sauce to the shrimp, add salt and pepper to taste. Cover the bowl and place in the refrigerator to chill for about 30 minutes. Then remove from the refrigerator add the chopped onions, and cucumbers. Now it is ready to serve, serve the agua chiles with tortilla chips or saltine crackers. Enjoy!
Facts about shrimp:

· Over five billion pounds of shrimp are produced every single year and one billion pounds of shrimp are consumed in the United States each year.

· There are over 2,000 species of shrimps.
· They usually live from 1 to 7 years.
·
Why do Shrimp, Salmon, and lobster turn pink or red? Well, Shrimp, Salmon, and lobster are some ocean creatures that when cooked change in color. All contain a protein called carotenoids (which are pigments), that breakdown when cooked and change pigment (huffpost.com).

Americans Consume One Billion Pounds Of Shrimp Annually


www.huffpost.com › shrimp-turns-pink_n_588f7d06e4b0522c7d3bf2a7